Per-Product Thank You Page
Assign a unique thank you page to any WooCommerce product. When a customer purchases that product, they see the assigned thank you page instead of the global default — giving you a one-to-one mapping between products and post-purchase experiences.
Overview#
Feature Name: Per-Product Thank You Page
Location: WooCommerce Product Editor → RedFox Thank You Page tab
Purpose: Display a specific thank you page when a particular product is purchased
Available In: Pro
What It Does#
- Assign a custom thank you page to any individual product from the product editor
- Set a priority value to control which page wins when an order contains multiple products with assigned pages
- Automatically resolve conflicts using a tiered tiebreaker system (priority → price → popularity)
- Works alongside the Rule Builder and global thank you page settings
When to Use#
Use Per-Product Thank You Page When:
- A product needs its own dedicated post-purchase experience (e.g., onboarding instructions, setup guides)
- You sell a flagship or premium product that deserves a unique thank you page
- You want to upsell or cross-sell products related to a specific purchase
- A product requires special post-purchase messaging (e.g., warranty registration, care instructions)
Use Rule Builder Instead When:
- You want to target groups of products based on categories, brands, or tags
- You need OR/AND logic to combine multiple conditions
- The same thank you page should apply to many products without editing each one individually
How It Works#
Assignment Flow#
- Open any WooCommerce product in the admin editor.
- Click the RedFox Thank You Page tab in the product data panel.
- Select a thank you page from the dropdown.
- Optionally set a priority value.
- Save the product.
When a customer places an order containing that product, the assigned thank you page is displayed.
Evaluation Flow#
When a customer completes an order, the plugin evaluates thank you page assignments in this priority order:
- Global thank you page is set as the base (priority 0).
- Rule Builder is evaluated (priority 10) — if a rule matches, it overrides the global page.
- Per-Product Thank You Page is evaluated last (priority 20) — if any product in the order has an assigned page, it overrides both the global page and any Rule Builder match.
Per-Product has the highest priority because it represents the most specific assignment — a direct one-to-one relationship between a product and its thank you page.
Multi-Product Conflict Resolution#
When an order contains multiple products that each have their own assigned thank you page, the plugin resolves the conflict using a three-tier tiebreaker system:
- Priority (higher wins) — The product with the higher priority value takes precedence.
- Price (higher wins) — If priorities are equal, the more expensive product wins.
- Popularity (more sales wins) — If both priority and price are equal, the product with more total sales wins.
Example: An order contains:
| Product | Thank You Page | Priority | Price | Total Sales |
|---|---|---|---|---|
| Premium Headphones | “Premium Audio TY” | 5 | $299 | 150 |
| USB Cable | “Accessories TY” | 0 | $12 | 800 |
| Wireless Mouse | “Peripherals TY” | 5 | $49 | 300 |
Result: “Premium Audio TY” is shown — Premium Headphones and Wireless Mouse are tied on priority (5), but Premium Headphones has the higher price ($299 vs $49).
Setting Up a Per-Product Thank You Page#
Step 1: Create a Thank You Page#
Before assigning a page to a product, you need a published thank you page.
- Go to Thank You Pages in the WordPress admin.
- Click Add New to create a new thank you page.
- Design the page using Gutenberg blocks.
- Publish the page.
Only published thank you pages appear in the product dropdown.
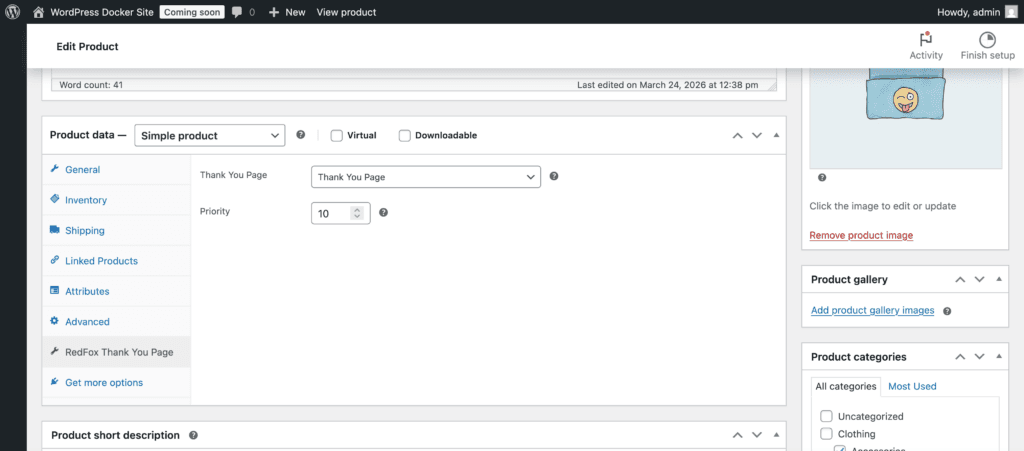
Step 2: Assign the Page to a Product#
- Navigate to Products and edit the product you want to customize.
- Scroll down to the Product data panel.
- Click the RedFox Thank You Page tab (look for the pin icon).
- In the Thank You Page dropdown, select the page you created.
- Optionally, set a Priority value (see below).
- Click Update to save the product.
Step 3: Test#
Place a test order containing the product and verify the correct thank you page is displayed.
Settings#
Thank You Page#
A dropdown listing all published thank you pages (custom post type redfoxwp_thank_you). Select the page to display when this product is purchased.
- Default: None (no per-product override)
- Selecting “— Select a Thank You Page —” removes the assignment
Priority#
A numeric value that determines which product’s thank you page wins when an order contains multiple products with assigned pages.
- Default: 0
- Range: 0–100
- Higher values win — a product with priority 10 takes precedence over a product with priority 5
- When priorities are equal, the tiebreaker system (price, then popularity) is used
Thank You Page Type Settings#
The Thank You Page Type setting (found in RedFox Thank You → Settings) controls whether Per-Product Thank You Page is active.
| Setting | Per-Product Active? |
|---|---|
| Show globally selected custom Thank You page | Yes |
| Rule Builder and Single Product only | Yes |
| Single Product only | Yes |
| Rule Builder only | No |
| Default WooCommerce Thank You page | No |
When Per-Product is inactive (due to the Thank You Page Type setting), product-level assignments are ignored — even if a product has a thank you page assigned, the default behavior for that setting is used instead.
Interaction with Rule Builder#
When both Per-Product and Rule Builder are active:
- The Rule Builder evaluates first and may override the global page.
- Per-Product evaluates second and overrides the Rule Builder if a match is found.
- Per-Product always wins over Rule Builder because it has higher filter priority.
This means if a Rule Builder rule matches an order and one of the products in that order has a per-product assignment, the per-product page is shown.
Example:
- Rule Builder rule: Orders containing any product in the “Electronics” category → show “Electronics TY” page.
- Per-Product assignment: Product “Pro Laptop” → show “Laptop VIP TY” page.
- Order contains: Pro Laptop + Wireless Keyboard (both in Electronics category).
- Result: “Laptop VIP TY” is shown — the per-product assignment on Pro Laptop overrides the Rule Builder match.
Tips#
- Start simple — Assign per-product pages only to your most important products. Use the Rule Builder for broader targeting.
- Use priority intentionally — Set higher priorities on flagship products so they always win in mixed orders. Leave most products at the default (0).
- Keep pages published — A per-product assignment is ignored if the assigned thank you page is not published. Draft or trashed pages are skipped.
- Check your Thank You Page Type setting — Make sure Per-Product is enabled in Settings. If the setting is “Rule Builder only” or “Default WooCommerce Thank You page”, per-product assignments are ignored.
- Test multi-product orders — If customers commonly buy multiple products together, place test orders with those combinations to verify the right page appears.
- Combine with Rule Builder — Use the Rule Builder for category-wide or tag-based targeting, and reserve per-product assignments for products that need a truly unique experience.